Security plugins for WordPress are very popular these days, I bet you have a list of must-have security plugins on your WordPress sites.
Among all the common security issues related to WordPress, I personally hate brute force attacks most, which cost one of my clients’ sites down and a painful customer service experience. So last year when I started some new WordPress sites on a Media Temple VPS hosting, I chose to use Fail2ban to deal with such attacks.
Why Fail2ban?
To be honest, there are no particular reasons that I can say why I choose Fail2ban to deal with brute-force login attacks, though it does very powerful. To me, it’s just because I want to explore features that I can’t have on a shared hosting. And I don’t have extra budget on a cloud proxy service, which would be a better solution I suppose.
Installing Fail2ban
If you are on Ubuntu or Debian, you can install Fail2ban with:
sudo apt-get install fail2ban
If you are on CentOS, Fail2ban doesn’t come with it, you’ll need to download the repository first. You can download it with this command if you are on CentOS 6:
rpm -Uvh http://dl.fedoraproject.org/pub/epel/6/x86_64/epel-release-6-8.noarch.rpm
Then installing Fail2ban:
yum install fail2ban
Please refer to the knowledge base from your hosting provider. If you’re on a Media Temple DV like me, you can check this article for more detail.
Creating the configuration file
Now let’s create the configuration file by copying a default config file to a new file:
cp /etc/fail2ban/jail.conf /etc/fail2ban/jail.local
We’ll come back later to add our own filter rule.
Start Fail2ban service
We can start Fail2ban now:
service fail2ban start
How Fail2ban keeps us safe from brute force attacks?
According to its official website, Fail2ban works in these ways to keep us safe from brute-force login attacks:
- Fail2ban scans log files (e.g. /var/log/apache/error_log) and bans IPs that show the malicious signs — too many password failures, seeking for exploits, etc.
- Generally Fail2Ban is then used to update firewall rules (iptables) to reject the IP addresses for a specified amount of time, although any arbitrary other action (e.g. sending an email) could also be configured.
- Out of the box Fail2Ban comes with filters for various services (apache, courier, ssh, etc).
From above we understand Fail2ban needs to know which logs it should keep eyes on, and besides services like ssh login, we can create custom filter rules, to ban brute-force login attacks on WordPress, Drupal or Joomla, etc.
We should also keep in mind that Fail2ban only reduces the rate of incorrect authentications attempts but not guarantees your websites 100% safe especially if they have weak authentication mechanism.
Creating the custom filter rule
The filter rule we create to detect brute-force login attacks looks like this:
In line 3 we define the failregex to tell Fail2ban what to watch in a log file. I adjust the the expression to make it work on a multisite network. You can replace it with code below for a standard WordPress:
failregex = ^ .* "POST /wp-login.php
The rule is plain simple. Now save it to Fail2ban’s filter directory /etc/fail2ban/filter.d/ and name it as wp-login.conf.
Testing the custom filter
We can test if the filter works with the following command:
The command is in this format:
fail2ban-regex log-file filter-to-test
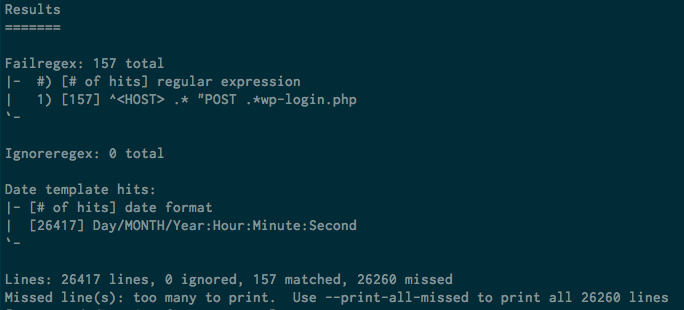
And the test results would looks like this:
If you’re experiencing brute force attacks at the time of this testing, the matched lines should be greater than 0, or it could still be 0.
Add the rule to jail.local
Now let’s append the rule to the jail.local:
Let’s take a look at these options:
- Line 2:
enablemust betrueto make the rule work. - Line 3: if you’ve got a SSL certificate for your domain, the
portshould behttp, https. - Line 4: we set 2 actions here. The
iptables-multiportaction will add a new rule to iptables that bans IPs perform the brute force attacks. Thesendmail-whoisaction will send notifications to the specified email address. You can change thenamein both actions to values different from mine. - Line 6: the
filtermust be the same as the filter’s file name. We set it towp-loginbecause we named the filewp-login.conf. - Line 7:
logpathis the key that we must provide Fail2ban with the correct path of server logs, so it can monitor the attacks for us. The path in my example shows the path of access logs on an Nginx server. Note that I useaccess*logto catch logs both for http and https. - Line 8:
maxretrymeans how many times the fail login can be tolerated. If the retry times exceeds the limits, the IP will be banned.
Fail2ban bans each IP for an hour by default. You can add a bantime option to set a different time span in seconds.
Restart Fail2ban service
Whenever you update the config files, please remember to restart Fail2ban:
service fail2ban restart
With this tutorial, I hope you’ve learned how to set up Fail2ban and make it work with WordPress.
If you have any question when following the steps in this tutorial, please let me know. I’d love to help.


Leave a Reply